FDEx- A Manual of FreedivingFreediving Explained is the world's largest and most comprehensive FREE online freediving manual. Here you will find everything you want to know about freediving, from explanations about the various pieces of equipment used in freediving, freediving physiology and philosophy and breathholding techniques to various freediving training methods. Use the menu at the right hand side of this page in order to browse through the different chapters in the manual.
Apnea - What is it ?The word apnea comes from the Greek phrase "a-pnoia" - 'without breathing'. Taken literally, the word apnea has no reference to the aquatic, however in current terminology it is used to refer to the sport of freediving: immersion underwater without the aid of respiration.
What's so special about it ?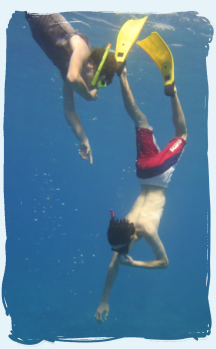
Different people are drawn to different aspects of this sport; For some, freediving is a way to enjoy the depths of the ocean without the need of heavy, clumsy and uncomfortable SCUBA equipment. Others see freediving as an extreme sport with the uniqueness of requiring deep relaxation and peace in contrast to most other adrenaline pumping extreme sports. Some see freediving as an instrument for hunting underwater. Many see freediving as an art form and a form of self expression and many others see freediving as the way to become one with the ocean and the rest of nature.The Benefits of Apnea
Regardless to what draws one into the practice of Apnea (Freediving), it is a form of deep meditation which leads to a positive change in ones awareness of oneself and his surrounding environment and in ones ability to concentrate. Freediving leads to a better physical and mental condition of those who practice it.
So who is a freediver ?Many people practice freediving without realizing it! A freediver is Anyone who holds his breath and is immersed in water; from a person who plays with the fish at the depth of two meters to the person who descends to a depth of two hundred meters using a sled, as long as your holding your breath underwater and enjoying it, you are a freediver.
Know Your Equipment
In order to feel comfortable while freediving it is important to know the various pieces of equipment that are being used and the proper way to use them. This article will examine the essential equipment used in freediving, its purpose and operation.
 The snorkel is a hollow tube usually made out of silicon, rubber or plastic. It operates as an extension of your respiratory system, allowing you to breath freely while your face is immersed in water. The mouthpiece (the lower black part) is inserted in the mouth while the upper part (with the red mark) stays out of the water, the tube itself is being firmly attached to the strap of the mask. A snorkel that is made out of rubber or super flexible silicone is recommended for freediving - it can be easily folded and held in the palm of your hand - this reduces the amount of drag created when moving underwater. Water sometimes enters the tube, when this happens one should exhale forcefully through the mouth - this will force the water out of the tube thus clearing it.
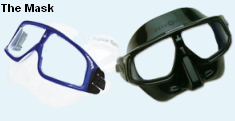 The mask enables the freediver to see clearly his underwater environment by creating an air space between the eyes and the water. A freediving mask must have a nose pocket so that the air space can be compensated during the dive (see Equalization). A low volume mask is recommended for freediving because less air is needed in order to compensate the air space in it. You can tell a low volume mask from other masks by the distance of the nose pocket from the lenses - the lower the volume the further the edge of the nose pocket is from the lenses. Water sometimes enters the mask, in order to force the water out of the mask without taking it off, one should put both of his index fingers on the top part of both lens frames and exhale forcefully from his nose while looking upwards.
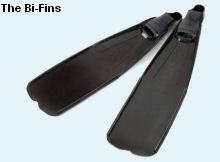 The freediving fins operate as extensions of the freedivers legs. Freediving fins are generally much longer and stiffer then swimming and scuba diving fins in order to move water with greater efficiency. Freediving fins are made of polymer (plastic), Glass fiber or Carbon fiber. Especially when first starting to use long bi-fins the leg muscles might cramp because of the great amount of effort needed to move with the fins, this is normal, when the muscle on the lower part of the leg cramps one should grab the edge of the fin and pull it towards the torso, when the muscles in the thigh area cramp one should grab the edge of the fin and pull it backwards towards the back.
 The weight belt carries the weights needed to counterweigh the positive buoyancy of the wetsuit. The amount of weights should be adjusted so that at the depth of -10 meters the freediver is neutrally buoyant. A freediving weight belt should ideally be made out of rubber. Nylon weight belts, which are very commonly used in scuba diving tend to swirl and move during the descend when freediving, this can lead to loss of concentration and control over movement. Rubber weight belts stick firmly to the body and do not move during the descend. The weight belt is worn on the waist rather then on the stomach as in scuba diving, this is done in order to be able to breath more easily.
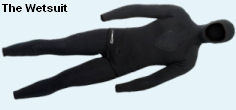 The freediving wetsuit is the freediver's second skin, it keeps the body warm while in the water. A freediving wetsuit should ideally be made out of open cell material (which sticks to the skin and limits the circulation of water between the skin and the suit) and in 2 parts; long trousers and a jacket with a beaver tail and hood (no zippers). Scuba suits are not suitable for freediving, water circulates quite freely in them, which is fine if your body is constantly on the move, this generates heat and keeps the water warm. However in freediving one tries to move as little as possible between dives and therefore a better insulation is needed. Most manufacturers who make open cell suits offer tailor made suits - these are highly recommended - they fit best.
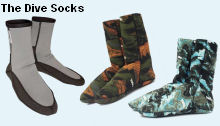 The dive socks ease the fraction between the freedivers feet and the bi-fin's (usually very unpleasant) rubber foot pockets. The dive sock also prevents cramps in the feet by keeping them warm. It is known that wearing a sock causes a slight loss of energy transfer from the legs to the fins. This however is not a very big loss and most freedivers use socks with bi-fins. Freediving socks should ideally be made of open cell neoprene material - this sticks to the skin and limits the circulation of water thus keeping the foot warmer for a much longer period of time without the need of moving the foot in order to generate heat.
Saturday, March 29, 2008
Freediving Explained
Freediving Disciplines
Disciplines of Apnea
There are seven major disciplines in the world of freediving;Constant Weight
This is the most common freediving discipline in the world today. In this discipline the amount of weights the freediver carries stays the same during the entire dive. The freediver may use the aid of bi-fins or a monofin.
UnassistedIn this discipline the aid of freediving fins and rope are forbidden. The freediver uses only his muscle strength in order to ascend and descend underwater. The principle of constant weight applies to this discipline.
Dynamic Apnea
In this discipline the freediver attempts to cover the greatest (horizontal) distance possible underwater on a single breath while making sure no part of his body raises out of the water. The freediver may use the aid of bi-fins or a mono-fin. The principle of constant weight applies to this discipline. (This discipline also has an unassisted version)
Static Apnea
In this discipline the freediver holds his breath for as long as possible with his face immersed in water.Free ImmersionFree immersion is considered by many to be the purest of freediving disciplines. In this discipline the freedivers descends and ascends underwater without the aid of any propulsion equipment, but only by pulling on a rope. The principle of constant weight applies to this discipline.
Variable Weight
In this discipline the freediver uses the aid of a ballast weight (that may weigh up to 1/3 of his body weight) to descend and his own strength to ascend, either with bi-fins, a mono-fin or by pulling on a rope.
No Limit
In this discipline the freediver uses the aid of a ballast weight (of any weight) to descend and ascends by a method of his choice (air filled baloon, inflatable vest or any other means). No limit is not considered to be an official discipline by any freediving association because of the great danger involved in performing no limit dives.
Friday, March 28, 2008
Freediving: A Short History
A Short History of Apnea
Many people wonder, when has this freediving "thing" began ? The most ancient evidence of freediving has been found on the coast of the Baltic sea, where a civilization that has been named "The Clam Eaters" has been dwelling about 7,000 - 10,000 years ago. The civilization was named so because the remains of clams and shellfish were found nearby - evidence these people used freediving as means of retrieving food from the bottom of the ocean.
Jewelry was to be made of pearls, a material that could only be retrieved from the bottom of the ocean, in ancient Egypt as early as 3,500 bc.
Apnea was certainly practiced in all of the cultures bordering on the Mediterranean basin, and this has been confirmed by traces visible in both archeological findings and chronicles handed down through Greek and Latin literature.
Modern Day Apnea
The first ever recorded freedive has been performed by a Greek fisherman named Haggi Statti in 1913. Haggi, age 35, has been introduced to a captain of an Italian fleet ship anchored in the Picadia bay. His task is to recover the ship's anchor, which has sunk to a bottom of about seventy-five meters. As payment he asks for a small sum of money, and the permission to be able to fish with explosives. After several days of searching the seafloor between depths of -60 and -80 meters he recovered the ship's anchor, returning from a depth of -76 meters after an immersion of around three minutes.
The first official record has been set in 1949 by Raimondo Bucher who has reached a depth of -30 meters where he has passed a parchment sealed in a canister to a diver below. This record has been broken in 1951 and set to -35 meters and broken again in 1952 and set to -39 meters.
The First Rivalry
In 1961 the record has been set at the depth of -50 meters by Enzo Maiorca, who together with his rival Jacques Mayol will dominate the world of freediving in the next three decades. In 1966, Mayol took the mark to -60 and the race for depth has began.
In 1968 Maiorca dove to a depth of -72 meters and a year later to a depth of -74 meters, a month later, Mayol responded by descending to a depth of -75 meters and -76 meters right after in Japan. Inflamed by the -76 of Mayol, Maiorca swam past him in the abyss to -77 and improved this depth twice to -78 and -80 meters. Mayol breaks the record again by 6 good meters. In 1974 Maiorca passes the baton to -87. Mayol responds by diving to a depth of -92 meters and thirteen months later, on the 23rd of November, Mayol reaches the legendary depth of -101 Meters. In 1988 Mayol performs a dive to -105 meters. Maiorca has retired with a dive to -101 meters, a suitable ending to a glorious diving career.
The Second RivalryIn 1989, the Cuban Francisco 'Pipin' Ferreras dove to a depth of -112 meters. The record has been broken in 1991 by the Italian Umberto Pelizzari and a new rivalry was born. On the 20th of September 1992, Pipin dives to a depth of -120 meters. Pelizzari responds on October 11th by diving to -123 and taking away the "Deepest Man" title from Pipin. Pipin reclaims the title on the 12th of November the same year by diving to a depth of -125 meters. Pipin Improves his depth 3 more times; on July of 1994 to -126 meters, -127 meters in November the same year, and on the 30th of July, 1995, he dives to a depth of -128 meters. On the 24th of October 1999, Pelizzari reclaims the "Deepest Man" title back with a dive to -150 meters.
The Apnea of the WomenThe history of women's apnea began in the early sixties. On the 26th of June 1965, Giuliana 'Jolly' Treleani dove to -31meters, taking the title that was established with -30 meters by Hedy Roessler who had overtaken the -25 meters of Francesca Trombi. Giuliana has traveled with Maiorca to cube where she reached the -45 meters mark. In 1986, Rossana Maiorca, daughter of Enzo, has reached a depth of -69 meters. In 1988 Patrizia Maiorca, Rossana's sister, has reached -70 meters while Rossana dove to a depth of -80 meters. One year later Angela Bandini, a student of Mayol, trounced everyone, men included by reaching the incredible depth of -107 meters.
Thursday, March 27, 2008
Know Your Equipment
Know Your Freediving Equipment
In order to feel comfortable while freediving it is important to know the various pieces of equipment that are being used and the proper way to use them. This article will examine the essential equipment used in freediving, its purpose and operation.
The snorkel is a hollow tube usually made out of silicon, rubber or plastic. It operates as an extension of your respiratory system, allowing you to breath freely while your face is immersed in water. The mouthpiece (the lower black part) is inserted in the mouth while the upper part (with the red mark) stays out of the water, the tube itself is being firmly attached to the strap of the mask. A snorkel that is made out of rubber or super flexible silicone is recommended for freediving - it can be easily folded and held in the palm of your hand - this reduces the amount of drag created when moving underwater. Water sometimes enters the tube, when this happens one should exhale forcefully through the mouth - this will force the water out of the tube thus clearing it.
The mask enables the freediver to see clearly his underwater environment by creating an air space between the eyes and the water. A freediving mask must have a nose pocket so that the air space can be compensated during the dive (see Equalization). A low volume mask is recommended for freediving because less air is needed in order to compensate the air space in it. You can tell a low volume mask from other masks by the distance of the nose pocket from the lenses - the lower the volume the further the edge of the nose pocket is from the lenses. Water sometimes enters the mask, in order to force the water out of the mask without taking it off, one should put both of his index fingers on the top part of both lens frames and exhale forcefully from his nose while looking upwards.
The freediving fins operate as extensions of the freedivers legs. Freediving and spearfishing fins are generally much longer and stiffer then swimming and scuba diving fins in order to move water with greater efficiency. Freediving fins are made of polymer (plastic), Glass fiber or Carbon fiber. Especially when first starting to use long bi-fins the leg muscles might cramp because of the great amount of effort needed to move with the fins, this is normal, when the muscle on the lower part of the leg cramps one should grab the edge of the fin and pull it towards the torso, when the muscles in the thigh area cramp one should grab the edge of the fin and pull it backwards towards the back.
Another type of fins that are commonly used in freediving are the monofins. A monofin is a single fin for both of the divers legs that resembles a marine mammal's tail. Monofins are even more energy efficient than freediving bi-fins and most freediving competitors use monofins in competition setting. Monofins also offer a unique and extra ordinery freediving experience.
The weight belt carries the weights needed to counterweigh the positive buoyancy of the wetsuit. The amount of weights should be adjusted so that at the depth of -10 meters the freediver is neutrally buoyant. A freediving weight belt should ideally be made out of rubber. Nylon weight belts, which are very commonly used in scuba diving tend to swirl and move during the descend when freediving, this can lead to loss of concentration and control over movement. Rubber weight belts stick firmly to the body and do not move during the descend. The weight belt is worn on the waist rather then on the stomach as in scuba diving, this is done in order to be able to breath more easily.
The freediving wetsuit is the freediver's second skin, it keeps the body warm while in the water. A freediving wetsuit should ideally be made out of open cell material (which sticks to the skin and limits the circulation of water between the skin and the suit) and in 2 parts; long trousers and a jacket with a beaver tail and hood (no zippers). Scuba suits are not suitable for freediving, water circulates quite freely in them, which is fine if your body is constantly on the move, this generates heat and keeps the water warm. However in freediving one tries to move as little as possible between dives and therefore a better insulation is needed. Most manufacturers who make open cell suits offer tailor made suits - these are highly recommended - they fit best.
The dive socks ease the fraction between the freedivers feet and the bi-fin's (usually very unpleasant) rubber foot pockets. The dive sock also prevents cramps in the feet by keeping them warm. It is known that wearing a sock causes a slight loss of energy transfer from the legs to the fins. This however is not a very big loss and most freedivers use socks with bi-fins. Freediving socks should ideally be made of open cell neoprene material - this sticks to the skin and limits the circulation of water thus keeping the foot warmer for a much longer period of time without the need of moving the foot in order to generate heat.
Freediving Physiology
Freediving Physiology
Understanding how your body works underwater is very important for both the feeling of comfort and wellbeing underwater and to avoid barotrauma (pressure related injury). This article will examine the various effects of immersion in water on the freediver's body.
The Dive Reflex
Submerging the face into water causes the mammalian diving reflex, which is found in all mammals (including humans), but especially in marine mammals (as, whales and seals.) This reflex puts the body into oxygen saving modus to maximize the time that can be spent under water. The effect of this reflex is greater in cold water than in warm water, and includes three factors:
Bradycardia, a reduction in the heart rate (of up to 50% in humans).
Peripheral Vasoconstriction, a decrease in blood flow to the extremities, in order to increase the supply of blood and oxygen to the vital organs, especially the brain.
Blood shift, the shifting of blood to the thoracic cavity, i.e. the chest between the diaphragm and the neck to avoid the collapse of the lungs under higher pressure during deeper dives.
Thus, both a conscious and an unconscious person can survive longer without oxygen underwater then in a comparable situation on dry land.
Pressure
The underwater environment has very different physical and chemical characteristics to the world in which we live above the surface. Water is denser then air and acts on the organism to produce modifications that are of great consequence to the freediver. The aspect that requires the most attention is pressure. Each dive exposes the body to variations of pressure proportional to depth. These variations in pressure require specific behavioral strategies. Physics teaches us the liquids are practically incompressible while gases are compressible. Water constitutes about 70% of our body mass. The remaining 30% is either solid (also incompressible) or spaces containing gas, which are subjected to the same pressure variations as those that affect us during our diving. This explains why when we immerse the 'empty' spaces of our body and equipment they are subject to a squeeze. Hence the ears, lungs and mask must all be compensated (see Equalization).
In physics, water pressure is a result of the application of a force downwards from the surface, given by :
P = F/S = 1kg/1cm² = 1 ATM = 1.013 Bar = 1013 MILLIBAR = 760mmHG
Atmospheric, Hydrostatic & Ambient
With reference to diving it is necessary to define what is meant by:
(ATM) Atmospheric Pressure, The pressure exerted by the weight of a column of air with a height of 10,000m (the height of the atmosphere that circles the earth) on a square centimeter on sea level.
(ATU) Hydrostatic Pressure, The pressure exerted by the height of the column of water above each square centimeter of an immersed body. Every 10m of depth is equal to 1 ATM.
(ATA) Ambient Pressure, also called absolute pressure, this is the sum of the atmospheric pressure at sea level, which is always 1 ATM, and the hydrostatic pressure that varies by 1 ATM every 10m of depth. In other words :
ATA = ATM + ATU
Therefore :
Sea level | ATA = 1ATM + 0 ATU = 1 ATA |
| At -10m | ATA = 1ATM + 1 ATU = 2 ATA |
| At -20m | ATA = 1ATM + 2 ATU = 3 ATA |
| At -90m | ATA = 1ATM + 9 ATU = 10 ATA |
Boyle's Law
Boyle's law states that:
The volume of a gas at constant temperature is inversely proportional to the pressure exerted on it.
This means that during a freedive descent, the freediver's lung volume is reduced in proportion to the pressure acting on it. At a depth of -50m a freediver will have a lung volume one sixth that of its volume on the surface. For many years it has been believed that the lungs will collapse after reaching a certain depth. However recent discoveries prove that blood plasma enters the thoracic cavity and compensates for the loss of air volume.
Hyperventilation And Black Out
For many years it has been thought that hyperventilating before a freedive increases the freediver's ability to stay longer underwater because a greater amount of oxygen is being inhaled. This, however, has been proven to be absolutely wrong. What really happens is as follows: Chemical receptors in our pulmonary system inform us about:
High levels of CO2 (carbon dioxide) which is being produced by the metabolization of oxygen.
Low levels O2 (oxygen) which are being reached because of the metabolization of the gas in order to sustain normal bodily function.
When the level of CO2 reaches a certain limit a stimulation begins which forces to body to resume breathing. When hyperventilating, what you are actually doing is reducing the level of CO2 while maintaining the same level of Oxygen (21% in volume), not to mention causing many muscles to contract in the process which also uses up your O2. When submerged, you do not feel the need to breath so rapidly because, as already said, CO2 level is low. By the time you feel the need to breath, the O2 level in your body is very close to the critical limit in which the body shuts down (blacks out) in order to save oxygen for the brain - you do not feel anything unusual, but as you ascend from the depth, especially in the last 10 meters (where the pressure variations are the greatest), your body might (without any prior warning):
Black Out (faint) - this is also referred to as 'SWB' or 'Shallow Water Blackout'.
Or enter a state of
Loss Of Motor Control - also referred to as 'LMC' or 'Samba' because of the involuntary movements of the body in this state which resemble a samba dance.
The Unknown
Forward progress has been made into the scientific understanding of man's responses to apnea, but there are still many uncertainties and physiological phenomena that await explanation.
"We are only at the beginning of a mysterious and fascinating road: we know neither its direction nor its destination, but we must walk it all the same. However it will take time, much time." - Dr. Luca Torcello, from The Manual of Freediving by Umberto Pelizarri.
Equalization Techniques
Equalization Techniques
As already discussed in the physiology chapter, our body contains air spaces which are exposed to pressure changes during freediving. These pressure changes must be compensated in order to avoid barotrauma (pressure related injury). This article will examine several techniques of pressure equalization in the facial air cavities and the compensation of the mask. It is important to remember that compensation is a very individual thing, there is no 'correct' amount of pressure equalization maneuvers for a certain depth.
Equalization Safety Rules
The equalization must come BEFORE the feeling of pain in the ears or sinuses.
In case pressure equalization is not possible or happens only partially abort the dive and ascend immediately!
Do not, under any circumstances, continue descend if you are unable to equalize pressure in your ears or sinuses, this WILL cause a rapture in the eardrum which may lead to a complete loss of hearing ability in the injured ear and WILL cause sinus squeeze which may in turn permanently damage the skull!
The Valsalva Maneuver
The Valsalva maneuver, named after Antonio Valsalva who was the first to record the pressurization of the middle ears in the 1700's, is performed by forcibly exhaling against closed lips and pinched nose. This forces air from the lungs into the middle ear if the Eustachian tube is open. This is the most common technique of compensation among freedivers, however, this technique is only effective in depths of up to -30 meters. In greater depths there simply isn't enough air left in the lungs to equalize the pressure in the ears and sinuses. This technique also causes the contraction of the lung muscles - an oxygen consuming practice.
To perform the Valsalva maneuver:
1) Pinch your nose using your thumb and index finger.
2) Try exhaling forcefully through your nose as if it was open.
3) A 'clanck' sound should be heard as if coming from the inside of your ears.
4) Repeat underwater as many times as needed.
The Frenzel Maneuver
Herman Frenzel was the Luftwaffe commander who taught this technique to dive-bomber pilots during the World War II. The technique is to close off the vocal cords, as though you are about to lift a heavy weight. The nostrils are pinched closed and an effort is made to make a 'k' or a 'guh' sound. By doing this you raise the back of the tongue and the 'Adam's Apple' will elevate. This turns the tongue into a piston, pushing air up. This maneuver can be done relatively effortlessly and is not as oxygen consuming as the valsalva maneuver. It can be repeated many times quickly underwater and is effective in depths of up to -80 meters. For a manual of Frenzel, an advanced variation of this technique and more general information about equalization see the Frenzel-Fattah manual.
The BTV (VTO) Maneuver
Stands for 'Beance Tubaire Volontaire'. In the 1950's the French navy developed a technique for middle ear equalization called 'Voluntary Tubal Opening'. This technique is difficult to teach and only approximately 30% of taught can perform it reliably. Muscles of the soft palate are contracted while upper throat muscles are employed to pull the Eustachian tube open. This technique is similar to the events that happen in the back of your throat at the end of a yawn. It is also similar to wiggling your ears and some people seem to be born with the talent. For a manual of BTV see the BTV (VTO) manual.
The Wet Equalization Maneuver
Performed by allowing water to flood the sinuses - by doing this the freediver cancels the need for air in order to equalize the pressure in the middle ear and sinuses. The freediver may chose to use the Frenzel maneuver in order to push water into the inner ear to reduce the air space further. This technique requires a lot of training to prevent aspiration of water into the lungs and drowning. The practice of this technique may cause infection of the ear and sinuses.
The Toynbee Maneuver
Joseph Toynbee lived in the 1800's and was the first to identify the crackling sound present in ones head with the anatomical opening of the Eustachian tubes during swallowing. His technique is to pinch nostrils shut while swallowing. The muscles in the back of the throat pull open the Eustachian tube and allow air to equalize if a gradient is present. Using this technique during a freedive, there is very little or no margin for error if the Eustachian tube doesn't equalize on first effort.
Equalization Of The Mask
To equalize the pressure in the mask the freediver must simply blow a small amount of air out of his nose into the mask (This is why a mask with a nose pocket so important for freediving). Usually, when performing the Valsalva or Frenzel maneuvers, some air 'leaks' out of the nose into the mask during or right after the equalization of the ears and thus equalizing the mask. Equalizing the mask becomes trickier at greater depths when the air volume in the lungs decreases. Many freedivers who dive to great depths don't use a mask during the dive or use Fluid Goggles, which are filled with liquid and do not need to be equalized.
Personalization
As already mentioned before, equalization is a very individual thing, many people use different combinations of the techniques described here with their own maneuvers. The author of this article, for example, uses a technique of pushing the jaw outwards and downwards while swallowing to equalize. It is important to give everything a try in the water to really know what works for you and what doesn't.
Analysis Of Accidents
Analysis Of Accidents
Accidents are rarely caused by a single factor or event, they are usually the result of a chain of stressful events which, if not recognized and dealt with in time, lower the level of control over the situation, a situation which quickly turns into panic and finally into an accident. It is important to understand the factors which may lead to stress and panic in order to identify them and to deal with them in time. The following article will examine the five main factor groups which may lead to stress and panic during freediving.
Physical Factors
Before entering the water, we must listen to our body and make sure it is fit enough to perform the dive. In case of the slightest doubt, the dive should be canceled. Factors which affect the body's fitness and ability to perform a freedive include smoking, fatigue, muscle cramps, blocked airways, illness etc.
Psychological Factors
During a freedive one must remain calm and at peace. Factors which may disturb one's peace and mental state include: Depression, a person who's mind is on ten different things during a freedive is wasting a lot of oxygen and is not in complete awareness of what's going on around him. Alcohol abuse slows the body's reflexes. Consumption of medicine or drugs can have great affects on ones state of mind (people who take medicine on regular basis must have the specific approval of a doctor in order to practice apnea!).
Faulty Equipment
Familiarity with the equipment and its suitability to the freediver are a key factor to enjoying the dive. The equipment must fit the freediver - using faulty equipment increases the stress factor and the risk of an accident occurring in the water. Factors which may increase the stress factor include loss of pieces of equipment, using a suit that doesn't fit the freediver's boy or the climate at the dive site, neglection of the equipment, improper treatment etc.
Environmental Factors
Even the most experienced freediver, once exposed to extreme environmental conditions, will experience stress. Extreme environmental conditions increase the rate of fatigue and the risk of an accident occurring in the water. If the environmental conditions are too harsh, the dive should be canceled. Environmental factors which may increase the level of stress include , extreme temperatures, strong winds, lack of visibility, strong fast shifting currents etc.
Lack Of Experience
Experience and training are the basis of safety and enjoyment. The lack of technical knowledge needed in a certain situation increases the level of stress and anxiety and the risk of an accident occurring in the water
Preparation For Water
Preparation For Water
Before entering into the water, we must learn how to relax and breathe correctly in order to avoid black-outs, drowning and premature surfacing. This article will examine a breathing technique and several behavioral techniques which are crucial for freediving.
Relaxation
The factor that affects the duration and quality of a freedive the most is relaxation. One must be completely relaxed in order to use oxygen efficiently and actually enjoy the freedive. Relaxation, however, comes only with experience - a good tip for beginner freedivers is not to think about the duration of the dive, or the depth you want to reach but about the beauty of the surrounding underwater environment and the wonderful feeling of weightlessness in the water - keep your mind focused on these two things and your aquatic skill will improve miraculously. An exercise that may help improve confidence underwater is to ascend as slowly as possible from each freedive - focusing on controlling the movement completely - most people find out they have a lot of spare air this way.
Breathing
Correct breathing is the base for a healthier life and better freediving. Breathing affects the whole body - it affects the nervous system, the heart, the digestive system, muscles, sleep, energy levels, concentration, memory and much more. The majority of people uses chest breathing - using only the top part of the chest on inhale and exhale. This type of breathing moves only a small amount of the air in the lungs - this is a very uneconomical way of breathing as it uses more muscle power than the deeper and more relaxed abdominal breathing. People that use chest breathing take more breaths per minute and as a consequence receive less oxygen and get rid of less waste products. Deep and effective breathing reaches all the way down to the abdomen, The abdomen expands forward to the sides and also towards the spine. The breathing movement can be felt all the way down towards the pelvic area and up towards the top of the lungs. Abdominal breathing has a calming and relaxing effect as we take fewer but more effective breaths - we absorb more oxygen and release more waste products with each breath.
How To Breathe From The Abdomen
1) Stand with your feet fairly close together.
2) Relax and free your mind from all thoughts (easier said then done!)
3) Be happy!
4) Open your mouth slightly.
5) Press gently and smoothly inward on your abdomen with your palms. Breath out during a count to six.
6) Hold your breath for a count of two.
7) Release smoothly and breath in under a count to six with focus on "popping" your belly.
8) Hold your breath for a count of two.
The whole process of pressing, holding, releasing and holding is called a breathing unit.
9) Repeat this whole process until you have done ten whole breathing units.
In the beginning try and forget about the breathing, it usually takes care of itself - concentrate on the pressing and releasing. Practice once in the morning and once in the evening for a couple of weeks. As you go along you can add more units to your exercise.
Know Your Environment
Know Your Environment
Before entering the water, especially in the tropical waters, it is important to know how the underwater environment works and how should one behave in it. This article will perform a brief examination the ecological system present in the Coral seas.
Corals
What we see as a coral is an assemblage of many individual, yet genetically identical, polyps. The polyps are multicellular organisms that feed on a variety of small organisms, from the microscopic zooplankton to small fish. Polyps are usually a few millimeters in diameter, and are formed by a layer of outer epithelium and inner jellylike tissue known as the mesoglea. They are radially symmetrical with tentacles surrounding a central mouth, the only opening to the stomach, or coelentron, through which both food is ingested and waste expelled. The polyp grows by vertical extension of its basal plate forming vertical calices which occasionally form a new, higher, basal plate. Over many generations this extension forms the large calciferous structures of corals and ultimately coral reefs. Corals grow at an average rate of one centimeter per year.
Behavior Near Coral Reefs
Since polyps are so small, sand grains can easily clog the polyps only bodily opening, causing the polyp to suffocate to death. A freediver must be extra careful not to lift any sand when close to corals. Since polyps are such small and delicate creatures, merely touching the corals may lead to the death of the polyps or to breaking a piece of coral - which takes an entire year to grow by one centimeter. Some corals release chemical agents on contact which my burn the skin causing extremely painful chemical burns. A freediver must never ever touch a living coral.
Fish
In the vicinity of coral reefs, a great diversity of fish can be found, most of which are absolutely harmless - if not disturbed. Remember, when freediving, you are the visitor in the marine creature's home. A freediver should never harass any marine creatures. Specifically a freediver should be careful not to disturb Moray eels - as they tend to bite if they feel cornered, their bite is extremely painful as most moray eel species are equipped with very long sharp needle like teeth - or Puffer fish - when a puffer fish feels in danger, it sucks water inside its body which causes it to grow to about 300% of its original size - amusing for the diver but an equivalent of a human heart attack for the fish, a puffer fish can perform this trick about three times in its entire lifetime.
Some fish have a protective mucous covering their body from infections caused by bacteria in the water, merely touching such a fish creates a hole in its defensive layer - leading to the a probable infection and the death of the fish. A Freediver must cherish and respect the underwater life.
The Buddy System
The Buddy System
The buddy system is a set of safety procedures that improve freediver's chances of avoiding and surviving accidents in or underwater by diving in a group of two or three. This article will examine the different procedures used in buddy diving and their purpose.
How does it work ?
With buddy freediving, each of the freedivers is presumed to have responsibility to the other. The 'buddies' are expected to monitor each other, be close enough together during the end of each freedive to be able to help in an emergency, to behave safely and to follow the plan agreed by the group before the freedive. When diving with a buddy both buddies must be aware of each others capabilities and limitations in water and agree on:
1) The maximum depth for the freediving activity (which should not be too far from the maximum depth of the most inexperienced buddy).
2) The behavior of the buddy remaining on the surface during the other buddies dive (such as the depth at which the two will meet underwater).
Safety Freediving
When freediving to depths of over -20 meters, it is highly recommended to agree with your buddy on a certain depth at which the two of you will meet, a depth of -10 meters or slightly deeper is optimal. This is done for several reasons - as already mentioned in the physiology section, the greatest pressure changes occur in last 10 meters below the surface, if anything can go wrong - this is where it probably will, therefore having a buddy who can assist in a case of emergency is crucial. Meeting the buddy at the end of the freedive (which is the hardest part of the dive) also reassures and calms the freediver - helping him reach the surface more safely.
In general, the presence of another freediver in the water increases the freediver's feeling of well being and confidence in the water and enhances the safety of both of them.
Freediving Safety Rules
Freediving Safety Rules
Below is a list of 20 safety measures to be taken while freediving.
Incompliance with any of the following rules will dramatically increase the chances of an accident occurring in the water.
"God helps those who help themselves" - Benjamin Franklin.
Never ever freedive alone and select your partner
Never dive at the same time as your partner. Your partner should be easily capable of rescuing a diver from the required depth and should be fully trained in rescue techniques and CPR. When performing a safety dive, the objective for the safety diver is to meet the freediver and escort him - face to face through the area of greatest danger - which is between -10 meters and the surface, the depth at which they meet should be relative to the depth that the freediver has dived but not deeper then -15 meters.
Never freedive after a scuba dive
The nitrogen remaining in the tissues after a scuba dive can lead to decompression sickness when micro-bubbles are recompressed and expand upon the rapid ascent during a freedive. Wait at least 12 hours after a scuba dive before you freedive.
Never 'ride' the flexibility of your eardrum
Equalize on descent only. Remember - equalization must come before the feeling of pain in the ears and sinuses. Never continue descending after a failed equalization. A nose clip, where used, should be removed on ascent.
Always be correctly weighted
It is dangerous to be over weighted, This can cause equalization problems on descent and unnecessary expenditure of effort on ascent. A good rule of thumb is to achieve neutral buoyancy at -10 meters.
Before entering the water make a complete dive plan together with your dive buddy and estimate sea conditions
It is essential that every freediver in the group knows exactly what every other freediver will be doing during the course of the outing. This includes warm-ups, deep dives, who is doing safety for whom and when etc.
On returning to the surface - blast clearing the snorkel nearly invariably leads to a shallow water black-out if the freediver has been close to his limits. Retention of the snorkel at depth complicates equalization and when diaphragm contractions begin can lead to the inhalation of water.
Never ever hyperventilate
Hyperventilation is more then 6 deep breaths per minute. This predisposes a freediver to begin the descent in tension with a high pulse rate and decreased CO2 levels. An improper balance of O2 and CO2 can prolong the "easy phase" of the breath hold at the expense of the "struggle phase" and could lead to a shallow water black-out. Proper ventilation has the objective of maximizing the saturation of O2 and minimizing the pulse rate - this is achieved by slow, deep strong ventilation, relaxation and concentration, and this not overdone.
Never dive without adequate rigging and flags
The 'safety' dive line indicates a corridor along which a safety diver can anticipate the return of a diver from depth. Where a buoy and not a boat is being used to suspend the line, it should be orange or red to be easily visible to surface traffic and large enough so it wont be pulled under the surface even by two divers ascending together. Its purpose is to support the dive line and give the freediver on the surface a restful place to prepare his dive. The safety line should be at least 10mm thick to allow for a good grip, preferably white in color. A diver who loses a fin or has a leg cramp can pull himself to the surface using the safety line.
Preserve the correct interval between deep dives. Be aware of the danger of
 multiple deep dives
Not less then 5 minutes between deep dives. The purpose of this is to allow gas balances to return to normal. Multiple deep dives can severely stress the system and the build up of lactic acid could be dangerous on subsequent dives. Never do more then one or 2 deep dives (the muscles produce lactic acid during activity when denied oxygen).
Never exhale underwater or forcefully exhale on surfacing
Exhalation on descent can cause early problems with equalization. On ascent it causes loss of buoyancy and hence more effort on the ascent which can lead to a shallow water black-out. With any dramatic fall in the pressure in the lungs the remaining reserve of oxygen in the blood will go to the lung and not the brain hence causing shallow water black-out. Any diaphragmatic movement will also act as an instigator for the breathing mechanism.
Avoid too rapid a turn around
Too dramatic a turn around at the end of the descent can lead to a deep water blackout. This is particularly true of very deep dives where blood shift is already a factor.
Never look down on descent or up on ascent
The extension of the neck will cause difficulty in equalization on descent and, on ascent, will affect necessary blood flow to the brain and increase pressure in the area of the baroreceptors in the neck which may cause the to send the wrong message to the central nervous system which may increase pulse rate. Also it is contrary to a hydrodynamic position.
Don't Increase pace on the last part of the ascent
Economy of movement is essential to conserve O2 and keep the pulse rate low. At the turn around point - patience, calm and economy of effort are essential. During the ascent a measured pace must be preserved throughout in spite of lactic acid build up.
Empty lung diving
Empty lung dives are purely an advanced technique which should be approached with EXTREME caution and under the direct supervision of an experienced instructor of these techniques. Sever and possibly permanent damage or death can result if misunderstood. The diver begins the decent with low O2 levels and can blackout without warning at depth where he will be negatively buoyant. If he does not get a laryngospasm at this point the negative pressure in his lungs will siphon in water and a certain drowning will ensue. A partner on full lungs should accompany the diver for the whole of the dive.
Never continue freediving after experiencing a samba or a black-out
Any category of LMC should indicate the end of diving for that person for that day.
Allow sufficient time for physiological adaptation
The body needs time to adapt to new and extreme conditions of prolonged breath-hold and great pressure. Temperature can vastly aggravate or exacerbate the above problems and should not be under estimated. The body is very flexible and forgiving but it is still essential to allow it sufficient time to adapt to new stresses. A headlong rush for greater depth or breath-hold times can either end in severe physical trauma or create a mental 'wall'. Problems like tinitis, pulmonary oedema or other pulmonary barotrauma sinus or even certain types of cardiac problems can result from pushing too hard and too fast.
Avoid negative suggestion
This can lead to stress and hence a danger of a shallow water black-out. The psychology of freediving works on understanding the tremendous power of mental suggestions, and how thinking positively can greatly assist in dive performance.
Never dive when tired or cold
Cold, tiredness, alcohol and drugs all impair judgment and breath hold ability and predispose the freediver to shallow water black-outs. As soon as you feel you are cold - your breath hold ability has already been compromised. Do not underestimate cold - congestion obviously leads to equalization difficulties and the greater danger of 'reversed ear'.
Food and hydration
It is recommended not to freedive within 4 hours of a full meal or two hours after a light snack. The reason for this is that a large volume of blood that could be carrying O2 to the brain is being diverted to the digestive system. Freediving nutrition is a whole issue in itself and should be understood. Dehydration in freedivers is caused by several factors; the mammalian dive reflex (greater production of urine), the expelling of huge quantities of water during ventilation and the chemical exchanges needed for energy production. Water should be there at every dive session and freedivers should be encouraged to drink. Dehydration vastly increases the risk of a shallow water black-out and severely compounds equalization problems.
Know yourself
A freediver should learn to be in touch with himself at all times and to know when to push and when to back off, to know when he is finding excuses and being mentally lazy, and when there is a genuine limitation for that day.
freedive accident how to freedive manual of freediving never dive with cold free diving release mask pressure freedive training freediving freediving equalization freediving training breathholding learn to freedive spearfishing freediving safety frenzel equalization hyperventilation
Wednesday, March 26, 2008
Movement Techniques
Movement Techniques In WaterThe following article will examine the different methods of movement used by freedivers in water. It is important to remember that movement within water is not an exact science. Eventually, every freediver develops their own style and technique for underwater movement.In General
Whether you are using bi-fins or a freediving monofin, the motion of your legs should be wide and relatively slow in order to fully utilize the complete width and length
of the fin and enhance the efficiency of movement underwater. Avoid moving any body parts which are not related to the movement of the fins (hands, head etc.) in order to save oxygen and to keep a streamlined position. If you are using, for instance, an equalization technique that requires you to use your hand, place your hand on your nose at the beginning of the free dive and your elbow close to your body so it touches the ribcage. This will prevent you from moving your hand back and forth in order to equalize, placing your elbow close to your body will help you stay streamlined in the water. Avoid any sharp movements underwater, sharp movements might lead to a faster heart rate and blood circulation, causing the body to use oxygen inefficiently which leads to the premature ending of the free dive - it is important to be as relaxed as possible before and during the dive.
Duck dive
In order to efficiently penetrate the surface of the water, we must perform a duck dive - tilting our body to an angle of 90 degrees to the surface of the water. When we tilt our body that way, the surface area of our body becomes much smaller and it enables our body to be pushed inside the water by its own weight. Some people use a single stroke motion with their hands in order to fully push their body into the water in case the body is unable to completely slide into the water using its own weight.
Movement Underwater
There are two main methods of movement once underwater;
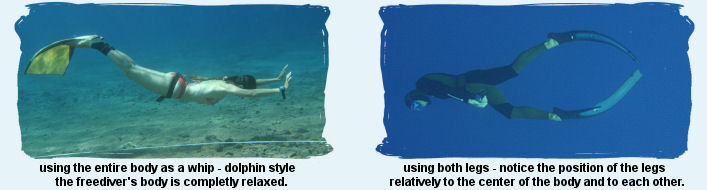
1) Using both legs - each leg moves in the opposite direction of the other to form an elliptic - round shape. Both legs must move symmetrically - they must be at the same distance from the center of the body at all times. This technique requires perfect coordination between both legs in order to perform an oxygen saving and muscle power efficient movement. When using this technique the freediver also tilts his body with each leg movement to the opposite direction of the leg that is currently "raised" (over the back).
2) Using the entire body as a whip while the fins or monofin is used to push the freediver through the water (dolphin style). In order to use this technique efficiently, the freediver must create a movement above his pelvis and use his body to transfer that movement all the way to the end of the fin, causing it to "whip" the water and push the freediver forward. The entire process of transferring the movement to the fin must be done without any unneeded contraction of any muscles, the freediver must keep his body completely loose and just let the motion pass on to the fin without interfering with it. It is important to bend your knees when using this technique in order to enable to motion to pass to the fin. Using this technique efficiently requires a lot of practice.
Training - Introduction
Fitness And Daily Workout
Keeping the freedivers body flexible and in good shape will enable him to move with greater ease underwater and develop his breath holding skills more efficiently. The following article will examine three methods of training for breath hold diving on the surface - swimming, running and stretching. (Other surface activities that may help the freediver to develop his skills include but are not limited to cycling, rowing, skiing, climbing etc.)
Introduction
Surface training has two main goals - the development of an anaerobic capacity (the ability to perform an activity without the presence of oxygen) and the development of aerobic power (VO2MAX). In many cases aerobic power is being neglected when training for breath holding, it is however a vital part of the training process. VO2MAX is a formula which expresses the amount of oxygen that the muscles can turn into energy in a certain amount of time. This article will examine three methods of surface training: swimming, running and stretching.
Aerobic Power
A person with a good aerobic power holds several characteristics which help him while performing a breath hold : high red blood cells count, high levels of hemoglobin, slower heart rate while resting and a higher energy capacity due to aerobic training.
Anaerobic Capacity
Training anaerobic capacity over a period of time enhances the freedivers ability to tolerate higher levels of lactic acid - which can be formed, for example, from rapid movement of the legs on ascend from depth or any other muscle activity which is performed when no oxygen is present.
Attention
It is very important to keep the different body muscles flexible (stretching is an important part of every training sessions and must be performed at the end of it) and to accustom the heart to working under stress. The training methods described in the following chapter are to be performed while gradually increasing intensity and difficulty level - according to your personal ability - the figures in the exercises below are purely for illustration - and should be altered according to your personal ability while maintaining the same ratio between the different figures shown in the examples.
Training - Running
Running
Running has a vital role in preparing the body for freediving. In order to bring the body to the point when its ready for breath hold practice, you must run on daily basis during a period of 60 days - in which you gradually increase the duration of the run from 30 to 60 minutes. At the end of the 60 day period the body is ready for a hypoxic and acidosis tolerance training period which will last 120 days - at the end of this period, the training cycle ends and a new one begins - another period of 60 days of running. The following article will examine different training methods used to improve the freedivers body tolerance to hypoxia and acidosis.
A) Running While Controlling Breath
Run slowly, breath as slowly as possible, maintain the same number of steps for each phase of the breath (inhale and exhale). The duration of the exhale must be twice as long as the inhale. For example: 10 steps exhaling - 5 steps inhaling.
Goals
1) Try to prolong the total duration of the run while maintaining a fixed number of steps for each phase of the breathing cycle.
2) Try to raise the number of steps for each phase of breathing cycle while maintaining a fixed duration for the run.
B) Running While Controlling Breath With Breath Holds
Run slowly, breath as slowly as possible and perform breathing cycles of, for example, 8 steps exhaling, 2 steps breath holding, 4 steps exhaling, 2 steps breath holding.
Goals
1) Try to prolong the total duration of the run while maintaining a fixed number of steps for each phase of the breathing cycle.
2) Try to raise the number of steps for each phase of breathing cycle while maintaining a fixed duration for the run.
C) Running While Breath Holding With A Short Recovery
Run slowly and perform a cycle of, for example, 10 steps breath holding, 5 steps breathing normally. Repeat the cycle 20 times.
Goals
1) Raise the number of breath holds for each training session.
2) Raise the number of steps for each breath hold.
D) Running While Breath Holding With A Long Recovery
Run slowly and perform a cycle of, for example, 50 steps breath holding, full recovery. Repeat the cycle 10 times.
Goals
Raise the distance to be covered during each breath hold.
E) Sprinting While Breath Holding
Run as fast as possible while holding your breath while maintaining a constant pace during the entire run. allow your body to fully recover after each run.
Goals
Prolong the duration of the run while maintaining a constant pace.
F) Prolonging Distance While Breath Holding With A Fixed Recovery
Run slowly and perform a cycle of, for example, 2 steps breath holding, 10 steps breathing normally, 4 steps breath holding, 10 steps breathing normally, 6 steps breath holding, 10 steps breathing normally... 20 steps breath holding, 10 steps breathing normally.
Goals
1) Prolong the maximum distance to be covered while holding your breath.
2) Reduce the number of steps for recovery between breath holds.
Building A Training Session
We suggest the following sets of exercises to be performed in rotation:
Set #1
10 min warmup run, 20 min exercise A, 15 min exercise C, 15 min exercise D; Stretching.
Set #2
10 min warmup run, 20 min exercise B, 15 min exercise F, 15 min exercise E; Stretching.
Set #3
10 min warmup run, 20 min exercise A, 15 min exercise F, 15 min exercise D; Stretching.
Set #4
10 min warmup run, 20 min exercise B, 15 min exercise C, 15 min exercise E; Stretching.
Training - Swimming
Swimming
Swimming makes a very good practice for freediving. A good swimmer can easily be converted into an excellent freediver (assuming he has no pressure equalization issues). Swimming promotes a good aquatic skill (feeling of comfort and wellbeing in water). Swimming helps strengthening and developing the cardiovascular and respiratory systems and trains the musculature in complete absence of gravity which has a considerable advantage to the mobility of joints. A muscle trained through swimming will maintain a long and hydrodynamic form with respect to the same muscle trained during dry activity. Swimming also makes an excellent aerobic exercise. However there should be a distinct sequence of work with different exercises. The following article will present 6 examples of training tables for swimming (as presented in Umberto Pelizarri's book - "Manual Of Freediving - Underwater On A Single Breath") - the times and distances are purely illustrative and should reflect an average swimmer - it is advisable to insert a session of about 20 min of fin swimming at the end of each session to maintain the form of muscles specifically involved in finning. Weight belts can be used to increase the workload.
Table A
200 m warm-up.
(Goals: 80% endurance 20% velocity)
4 * 100 crawl, 10'' rest.
(Goals: 80% endurance 20% velocity)
3 * 200 crawl, arms only, 15'' rest.
(Goals: 80% endurance 20% velocity)
swim 1 length slowly, 1 length quickly;
2 L.S, 2 L.Q; 3 L.S 3 L.Q; 4 L.S 4 L.Q;
3 L.S, 3 L.Q; 2 L.S 2 L.Q; 1 L.S 1 L.Q.
(Goals: 85% endurance 15% velocity)
Table B
200 m warm-up.
4 * 100 crawl, 20'' rest.
3 * 100 crawl, 10'' rest.
2 * 100 crawl, 5'' rest.
(Goals: 80% endurance 20% velocity)
5 * 50, arms only, 15'' rest.
(Goals: 80% endurance 20% velocity)
2 * 150, arms only, 3' rest.
(Goals: 80% endurance 20% velocity)
4 * 50 sprint, 1' rest.
(Goals: 10% endurance 90% velocity)
Table C
200 m warm-up.
2 * 200, 20'' rest.
2 * 100, 15'' rest.
2 * 50, 10'' rest.
(Goals: 80% endurance 20% velocity)
steps: 50, 100, 200, 300, 200, 100, 50 with 1' rest, and at a quick pace.
(Goals: 45% endurance 55% velocity)
300 m arms only, 2 * slowly, 1 * very quickly.
(Goals: 85% endurance 15% velocity)
Table D
200 m warm-up.
3 * 100, 20'' rest.
3 * 75, 15'' rest.
3 * 50, 10'' rest.
(Goals: 80% endurance 20% velocity)
5 * 50, 10'' rest.
(Goals: 75% endurance 25% velocity)
6 * 25, departing every 1', maximum velocity.
(Goals: 10% endurance 90% velocity)
3 * 50 departing every 2', maximum velocity.
(Goals: 10% endurance 90% velocity)
Table E
200 m warm-up.
(Goals: 45% endurance 55% velocity)
4 * 50, departing every 1'30''.
(Goals: 85% endurance 15% velocity)
1 * 400, legs only; 1 * 400, arms only.
(Goals: 100% hypoxic breathing)
2 * 400, 30'' rest, 1 L.S, 1 L.Q.
(Goals: 95% endurance 5% velocity)
Table F
200 m warm-up.
(Goals: 80% endurance 20% velocity)
5 * 75, departing every 1'45''.
(Goals: 80% endurance 20% velocity)
5 * 50, arms only, departing every 1'45''.
(Goals: 100% hypoxic breathing)
1000 m, swimming 100 slow, 100 quick, 200 slow, 200 quick, 100 slow, 100 quick, last 200 at maximum velocity.
(Goals: 72.5% endurance 27.5% velocity)
Training - Static Tables
Static Tables
As already mentioned in chapter A, high level of carbon dioxide causes the urge to breathe. If so, in order to prolong the duration of freediving, we must accustom our body to high levels of carbon dioxide (CO2) and to low levels of oxygen (O2). Accustoming the body to these extreme conditions is a long process, noticeable results will not appear within days or even weeks - however persistence in static training will lead to dramatic improvement in the long run. Static tables are actually sequences of timed static breath holds (with no movement during the breath hold) - designed to accustom the body to the extreme conditions of lack of oxygen or excess carbon dioxide. The tables can be performed in water or on the surface. In order to begin training static tables, you must first be aware of your personal best because both types of tables (CO2 and O2) are based on it - meaning - the first practice session will be dedicated to performing a maximum breath hold, It is recommended to perform several warm up breath holds before attempting to perform the maximum breath hold. The personal best should be monitored once in 2 months and the tables should be adjusted accordingly.
Attention! Violation of the table limits may cause permanent damage to the respiratory system, do not practice more then one table per day ! Never exceed eight cycles within one table and always practice with a buddy who is completely aware of what you are doing. Practicing static tables may lead to an LMC or even a black out.
CO2 Tolerance Table
The following static table is designed to accustom the body to high levels of carbon dioxide by reducing the duration of resting time between fixed breath hold periods. The duration of the timed breath hold should not exceed 50% of your personal best and the table should consist of no more then 8 cycles. The following table consists of 8 cycles and is based on a personal best of 3 minutes;
rest - 2:30 min ; hold - 1:30 min
rest - 2:15 min ; hold - 1:30 min
rest - 2:00 min ; hold - 1:30 min
rest - 1:45 min ; hold - 1:30 min
rest - 1:30 min ; hold - 1:30 min
rest - 1:15 min ; hold - 1:30 min
rest - 1:00 min ; hold - 1:30 min
rest - 1:00 min ; hold - 1:30 min
Total duration 25:15 min
This table can be adjusted to your ability by changing the breath hold duration to 50% of your personal best or by reducing/prolonging the duration of the initial resting period.
Goals
1) Reduce the duration of the initial and final resting periods while maintaining a fixed breath hold duration.
2) Prolong the duration of the fixed breath hold while maintaining the same duration for resting periods.
3) Prolong the duration of the fixed breath hold while reducing the duration of the initial resting period.
O2 Tolerance Table
The following static table is designed to accustom the body to extremely low levels of oxygen by prolonging the duration of breath holds between fixed resting periods. The duration of the last breath hold in this table should not exceed 80% of your personal best and the table should consist of no more then 8 cycles. The following table consists of 8 cycles and is based on a personal best of 3 minutes;
rest - 2:00 min ; hold - 1:00 min
rest - 2:00 min ; hold - 1:15 min
rest - 2:00 min ; hold - 1:30 min
rest - 2:00 min ; hold - 1:45 min
rest - 2:00 min ; hold - 2:00 min
rest - 2:00 min ; hold - 2:15 min
rest - 2:00 min ; hold - 2:30 min
rest - 2:00 min ; hold - 2:30 min
Total duration 30:45 min
This table can be adjusted to your ability by changing the maximum breath hold duration to 80% of your personal best or by reducing/prolonging the duration of resting periods between breath holds.
Goals
1) Reduce the duration of the fixed resting period while maintaining the same duration for breath holds.
2) Prolong the duration of the initial breath hold while maintaining the same duration for resting periods.
3) prolong the duration of the initial breath hold while reducing the duration of the fixed resting period.
Important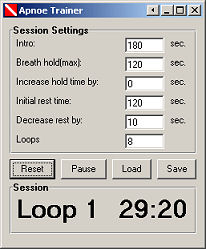
It is recommended to perform between two to four tables per week - one at a time - Never perform both types of table during the same day.
Static Table Training Software
"ApnoeTrainer" is a software designed to calculate and build static tables for O2 and CO2 tolerance. It also "plays" the table in real time and acts as a guide while playing it - it performs a vocal countdown before each breath hold and informs the user when a resting period begins. It is a freeware and is free of adware and spyware. Click here to download.
Training - Apnea Walking
Apnea Walking
Apnea walking is a simple and affective exercise aimed at the improvement of ones breath holding ability. Apnea walking increases the tolerance level for high levels of CO2, Low levels of O2 and the tolerance for the build up of lactic acid in the muscles during anaerobic activity.
Attention! Always perform apnea walking practices with a buddy who is aware of what you are doing. Pushing your limits while practicing apnea walking may lead to LMC and even black out.
Performing the exercise
1) Sit comfortably with your back straight.
2) Place the palms of your hands on your knees.
3) Breath deep breaths (do not hyper ventilate) and prepare yourself for a breath hold.
4) Hold your breath for a period of 1 minute while sitting.
5) Stand up while still holding your breath.
6) Begin walking on a preset path.
7) Concentrate your thoughts on arriving at the end of the preset path.
8) Allow your body to rest and repeat the exercise, prolong/shorten the length of the path according to your ability.
Remember, you are not at your best at all times, the results may vary from time to time.
Training - Breathing Through Straws
Breathing Through Straws
The following article will examine a training method of breathing through straws, its advantages and its affects on the freedivers body.
Introduction
The beauty of the exercise of breathing through straws (or any other airway constrictor) is that it can be done anywhere, and anytime; while driving, at the office or while doing house chores - which cant be done with breath hold practices.
Why Breathing Through Straws
Breathing through straws stretches and strengthens the intercostal muscles which is very good for freediving. Also, while breathing through an airway constrictor we limit the amount of CO2 that is being expelled from our body with each breath - thus building tolerance to higher then normal concentrations of CO2 in our system - also very good for freediving.
How To Do The Exercise
The cheapest and fastest way to start exercising breathing through an airway constrictor is to purchase a pack of house hold straws and breath through them. The advantages of using house hold straws are that they are very cheap and that they come in a wide range of diameters. The disadvantages are that they are ruined very quickly by the fraction with our teeth and that you cannot regulate the constriction of the air flowing through them very accurately. If you feel breathing through a straw is very easy for you, bend the end of it to allow less air to pass and be expelled with each breath.
Advanced Exercise
The more practical (and more expensive) alternative to straws is an instrument called "Powerlung". This instrument is basically a tube with a screw and a mouth piece. You canregulate the workload by adjusting the screw. The prices of this instrument range from 25 - 100 $ on the internet.
Conclusion
Breathing through straws is a great exercise that guarantees an improvement in breath hold ability in the long run. It is important not to do the exercise in areas with polluted air - while breathing through our moth, our body doesn't filter the air we inhale. Also, it is not recommended to perform the exercise in extreme temperatures, our body cant warm up/cool down the air the is being inhaled through our mouth. The exercise can be performed for as long as you wish as long as it doesn't exhaust you.